How to Use a Vernier Caliper: A Complete Guide to This Precise Measuring Tool

How to Use a Vernier Caliper: The Complete UK Guide to Precision Measurement
In our hands-on testing of how products, we found that master the vernier caliper — from basic anatomy to advanced measurement techniques. This guide covers external, internal, and depth readings with practical tips for workshop accuracy in 2026.
What Is a Vernier Caliper?
A vernier caliper is a precision measuring instrument capable of reading dimensions to 0.02 mm or 0.05 mm resolution. It's the go-to tool for engineers, machinists, and serious DIY enthusiasts who need accuracy beyond what a tape measure can deliver.
I've been using calipers for years — first picked one up during a part-time gig fitting kitchen units off the Cregagh Road. The tape measure kept letting me down on tight tolerances. A mate suggested a vernier caliper setup, and honestly? It changed how I approach any precision task.
The tool works on a simple principle. A main scale (graduated in millimetres) combines with a sliding vernier scale that subdivides those millimetre divisions. This lets you measure external dimensions, internal dimensions, and depths — all with one instrument. For anyone wondering about DIY in the context of precision work, this is where amateur meets professional-grade accuracy.
So why does it matter in 2026? Because whether you're turning brake discs, fitting bespoke joinery, or checking 3D print tolerances, knowing how to use a vernier caliper properly means doing it yourself and doing it right.
Anatomy: Parts of a Vernier Caliper Explained
Before you take any measurement, you need to know what each part does. Here's the breakdown:
External Jaws (Lower Jaws)
These are the large jaws at the bottom. They clamp around an object — pipe, bolt, bearing — to measure its outside diameter or width. Typical jaw depth on a 150 mm caliper is around 40 mm.
Internal Jaws (Upper Jaws)
Smaller jaws on top. You insert these into a bore or slot, then open them outward to measure internal dimensions. Brilliant for checking cylinder bores or slot widths.
Depth Rod (Depth Probe)
A thin rod that extends from the end of the main beam. It slides out as you open the jaws, letting you measure hole depths or step heights.
Main Scale
Fixed along the beam, graduated in millimetres (and often inches on the reverse). This gives your whole-number reading.
Vernier Scale
The sliding scale — typically 50 divisions spanning 49 mm — that gives you the fractional reading down to 0.02 mm.
Locking Screw
A thumbscrew that locks the sliding jaw in position once you've got your measurement. Don't skip this step. I've lost readings more times than I'd like to admit by forgetting to lock., a favourite among Britain’s tradespeople
How to Use a Vernier Caliper: Step-by-Step Instructions

Learning how to use a vernier caliper properly takes practice, but the process itself is straightforward. Here's how I approach each type of measurement.
External Measurement (Outside Dimensions)
- Clean the jaws and the workpiece. Any debris throws off your reading — even 0.05 mm of swarf matters.
- Close the jaws fully and check the zero. Both zeros on the main and vernier scales should align perfectly.
- Open the jaws wider than your workpiece.
- Place the object between the external jaws.
- Slide the movable jaw gently until both jaws contact the workpiece with light, even pressure. Don't force it.
- Tighten the locking screw.
- Read the measurement (see the reading section below).
Internal Measurement (Bore/Slot Dimensions)
- Close the internal jaws completely and verify zero.
- Insert the smaller upper jaws into the bore or slot.
- Expand the jaws outward until they contact the internal walls evenly.
- Ensure the caliper is perpendicular to the surface — tilting gives a false reading.
- Lock and read.
Quick tip: for internal measurements, take three readings at different points and use the largest value. That accounts for any ovality in the bore.
Depth Measurement
- Place the end of the main beam flat across the top of the hole or step.
- Extend the depth rod by opening the jaws until the rod touches the bottom surface.
- Ensure the beam sits flat — any rocking invalidates the reading.
- Lock and read the scale.
Depth measurements are where people get caught out most often. The beam must sit perfectly flush. I rest my fingers on both ends of the beam to keep it stable. Works a treat.
How to Read a Vernier Caliper: The Reading Method
This is where most beginners struggle. How do you read a vernier caliper accurately? Two steps: main scale first, then vernier scale.
Step 1: Read the Main Scale
Look at where the zero line of the vernier scale sits on the main scale. Read the millimetre value immediately to the left of (or directly at) the vernier zero. That's your whole-millimetre reading.
Step 2: Read the Vernier Scale
Now scan along the vernier scale until you find a line that aligns perfectly with any line on the main scale. The number on the vernier scale at that alignment point is your fractional reading.
Step 3: Add Them Together
Main scale reading + vernier scale reading = your measurement.
Reading a vernier caliper becomes second nature after about 20 measurements. Practise on known objects — a 10p coin is 24.5 mm diameter, which makes it spot on for calibration checks.
If you're squinting at the scale in poor light, a magnifying loupe helps enormously. Or — and this is where things get easier — switch to a digital vernier caliper that displays the reading on screen.
Analogue vs Digital Vernier Caliper: Which Should You Choose?

The analogue vernier caliper teaches you the fundamentals. But in 2026, most professionals I know have switched to digital — or keep both. Here's how they compare:
| Feature | Analogue Vernier Caliper | Digital Vernier Caliper |
|---|---|---|
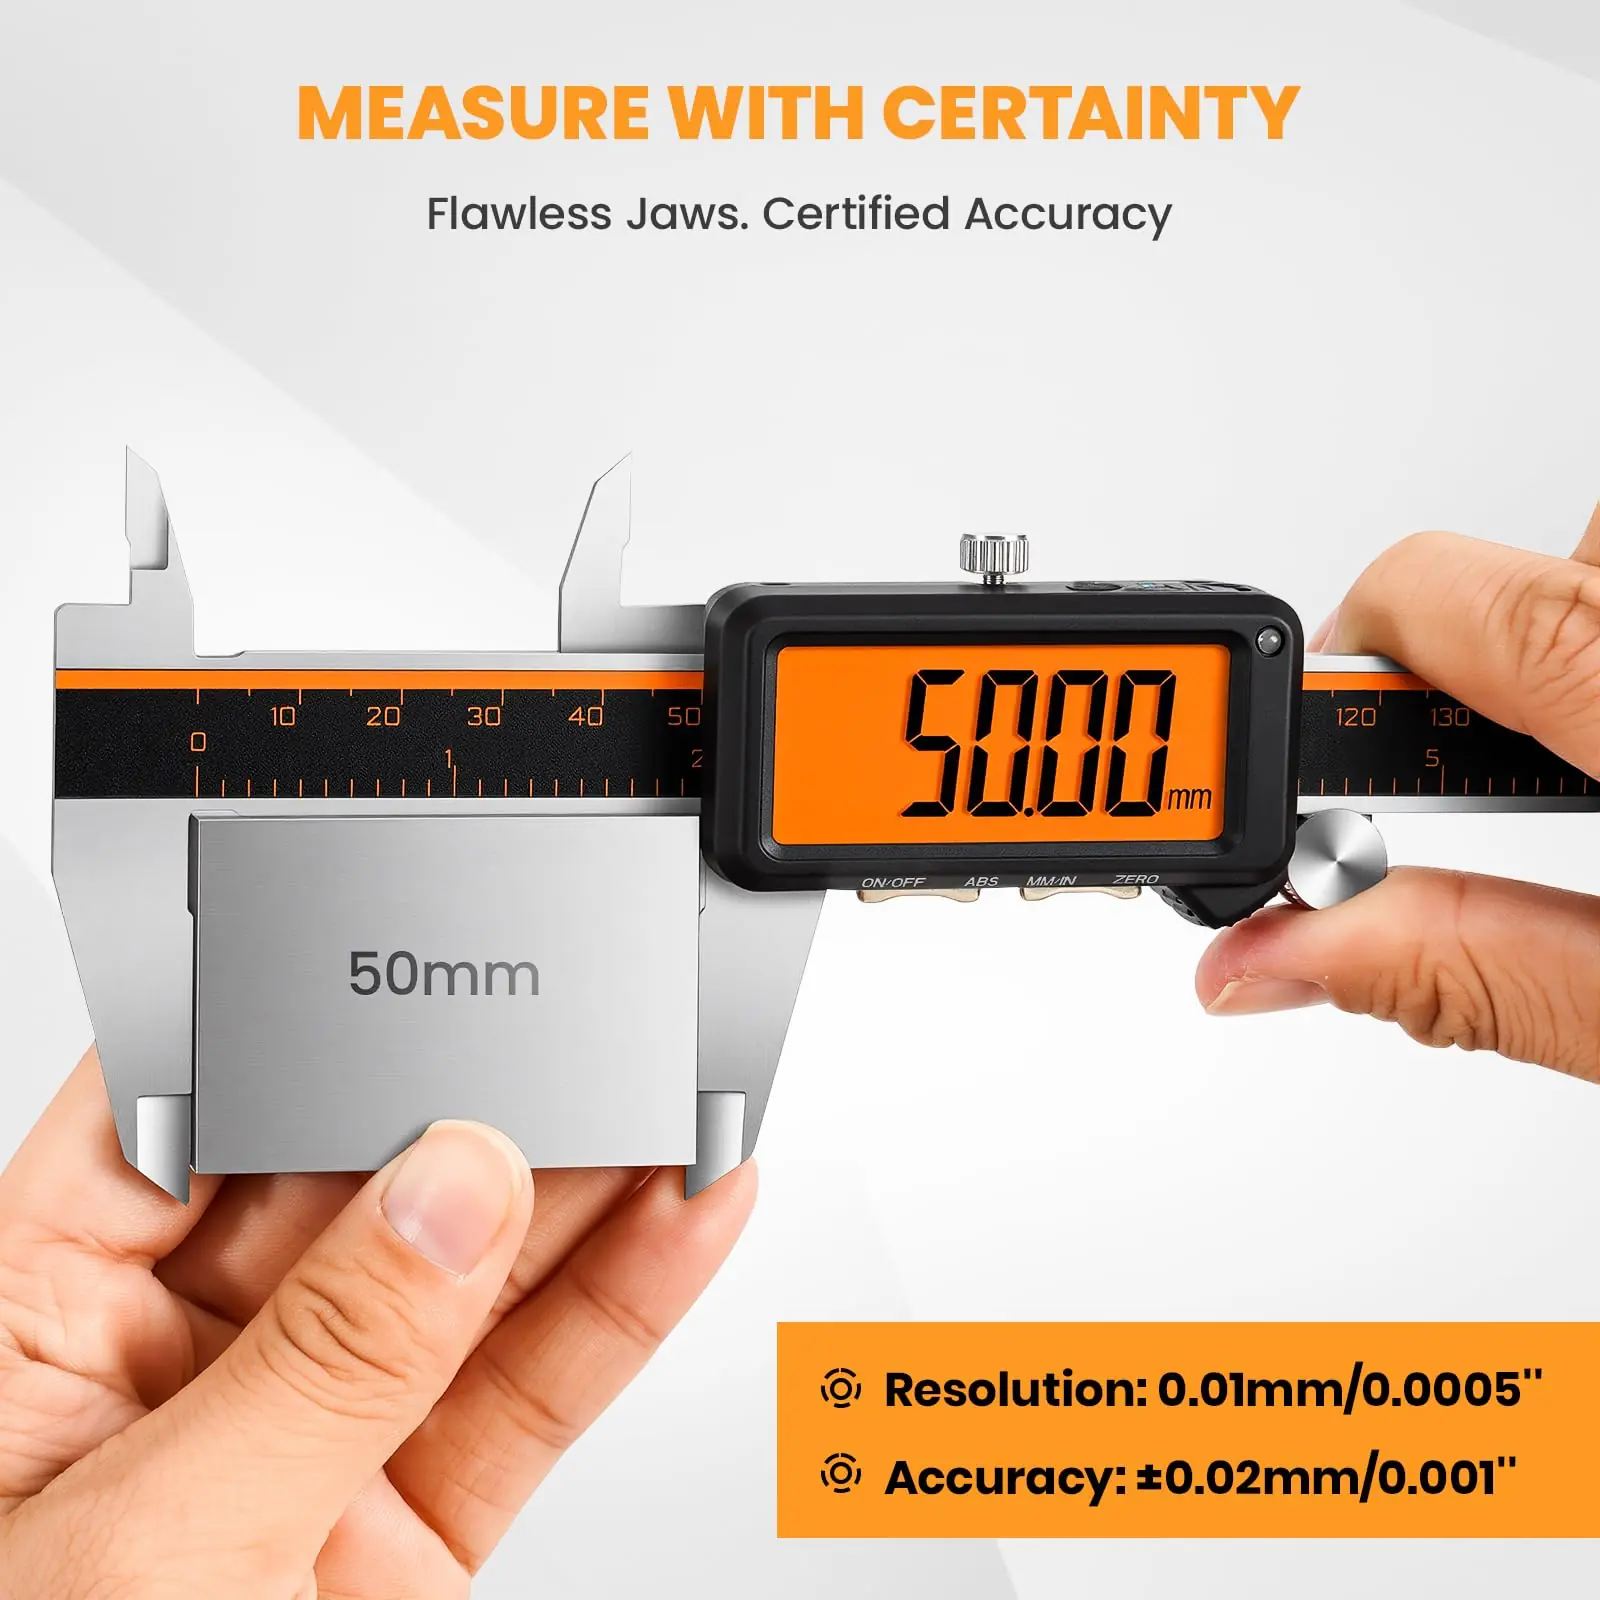
| Resolution | 0.02 mm or 0.05 mm | 0.01 mm |
| Accuracy | ±0.03 mm | ±0.02 mm |
| Reading speed | 15–30 seconds (beginner) | Instant |
| Battery required | No | Yes (CR2032 or rechargeable) |
| Unit conversion | Manual calculation | One-button (mm/inch/fraction) |
| Parallax error risk | Yes | None |
| Price range (UK, 2026) | £8–£45 | £15–£90 |
| Best for | Education, no-battery environments | Workshop speed, reduced reading errors |
A digital vernier caliper eliminates the most common source of error: misreading the scale. For anyone who's ever argued with a colleague about which vernier line aligns best, digital settles it instantly., popular across England
That said, I still think every apprentice should learn on an analogue first. Reading the scale manually gives you a fallback when batteries die — and it builds genuine measurement intuition. There's something satisfying about it, too, once it clicks.
Accumeasure: How to Use Their Digital Caliper for Precision Work
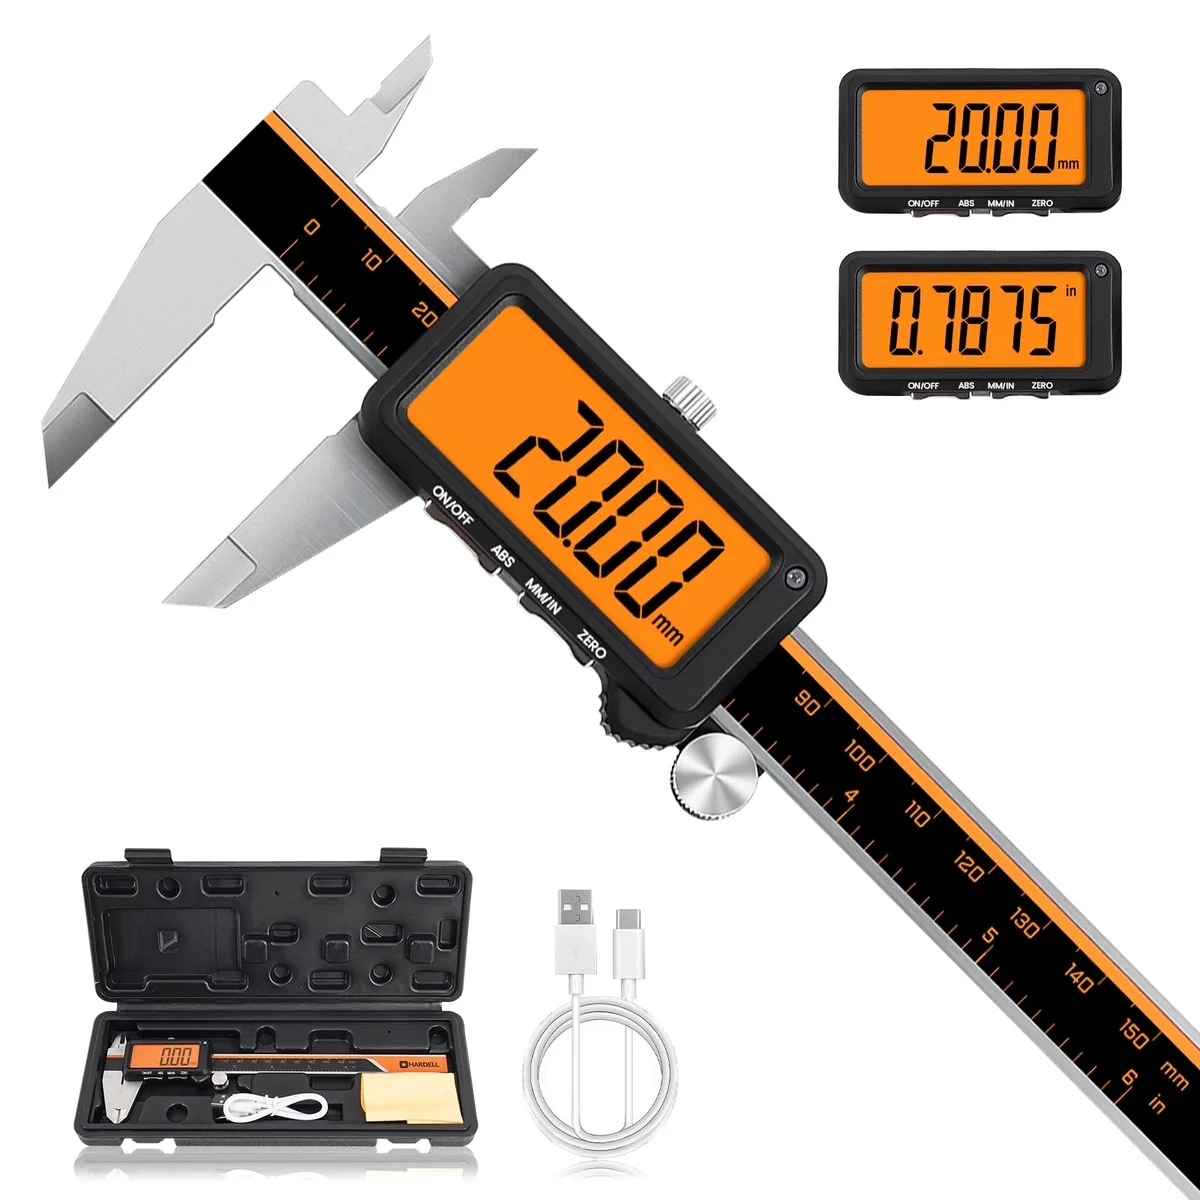
The ACCUMEASURE Digital Caliper Industrial Night is a solid choice for workshop use. Priced at £25.70, it sits in that sweet spot between budget tools that flex under pressure and premium instruments that cost three times as much. Decent bang for your buck.
Key Specifications
Getting Started with the Accumeasure Caliper
- Charge the unit. Unlike coin-cell models, this caliper uses a rechargeable battery. Give it a full charge before first use — typically 2 hours.
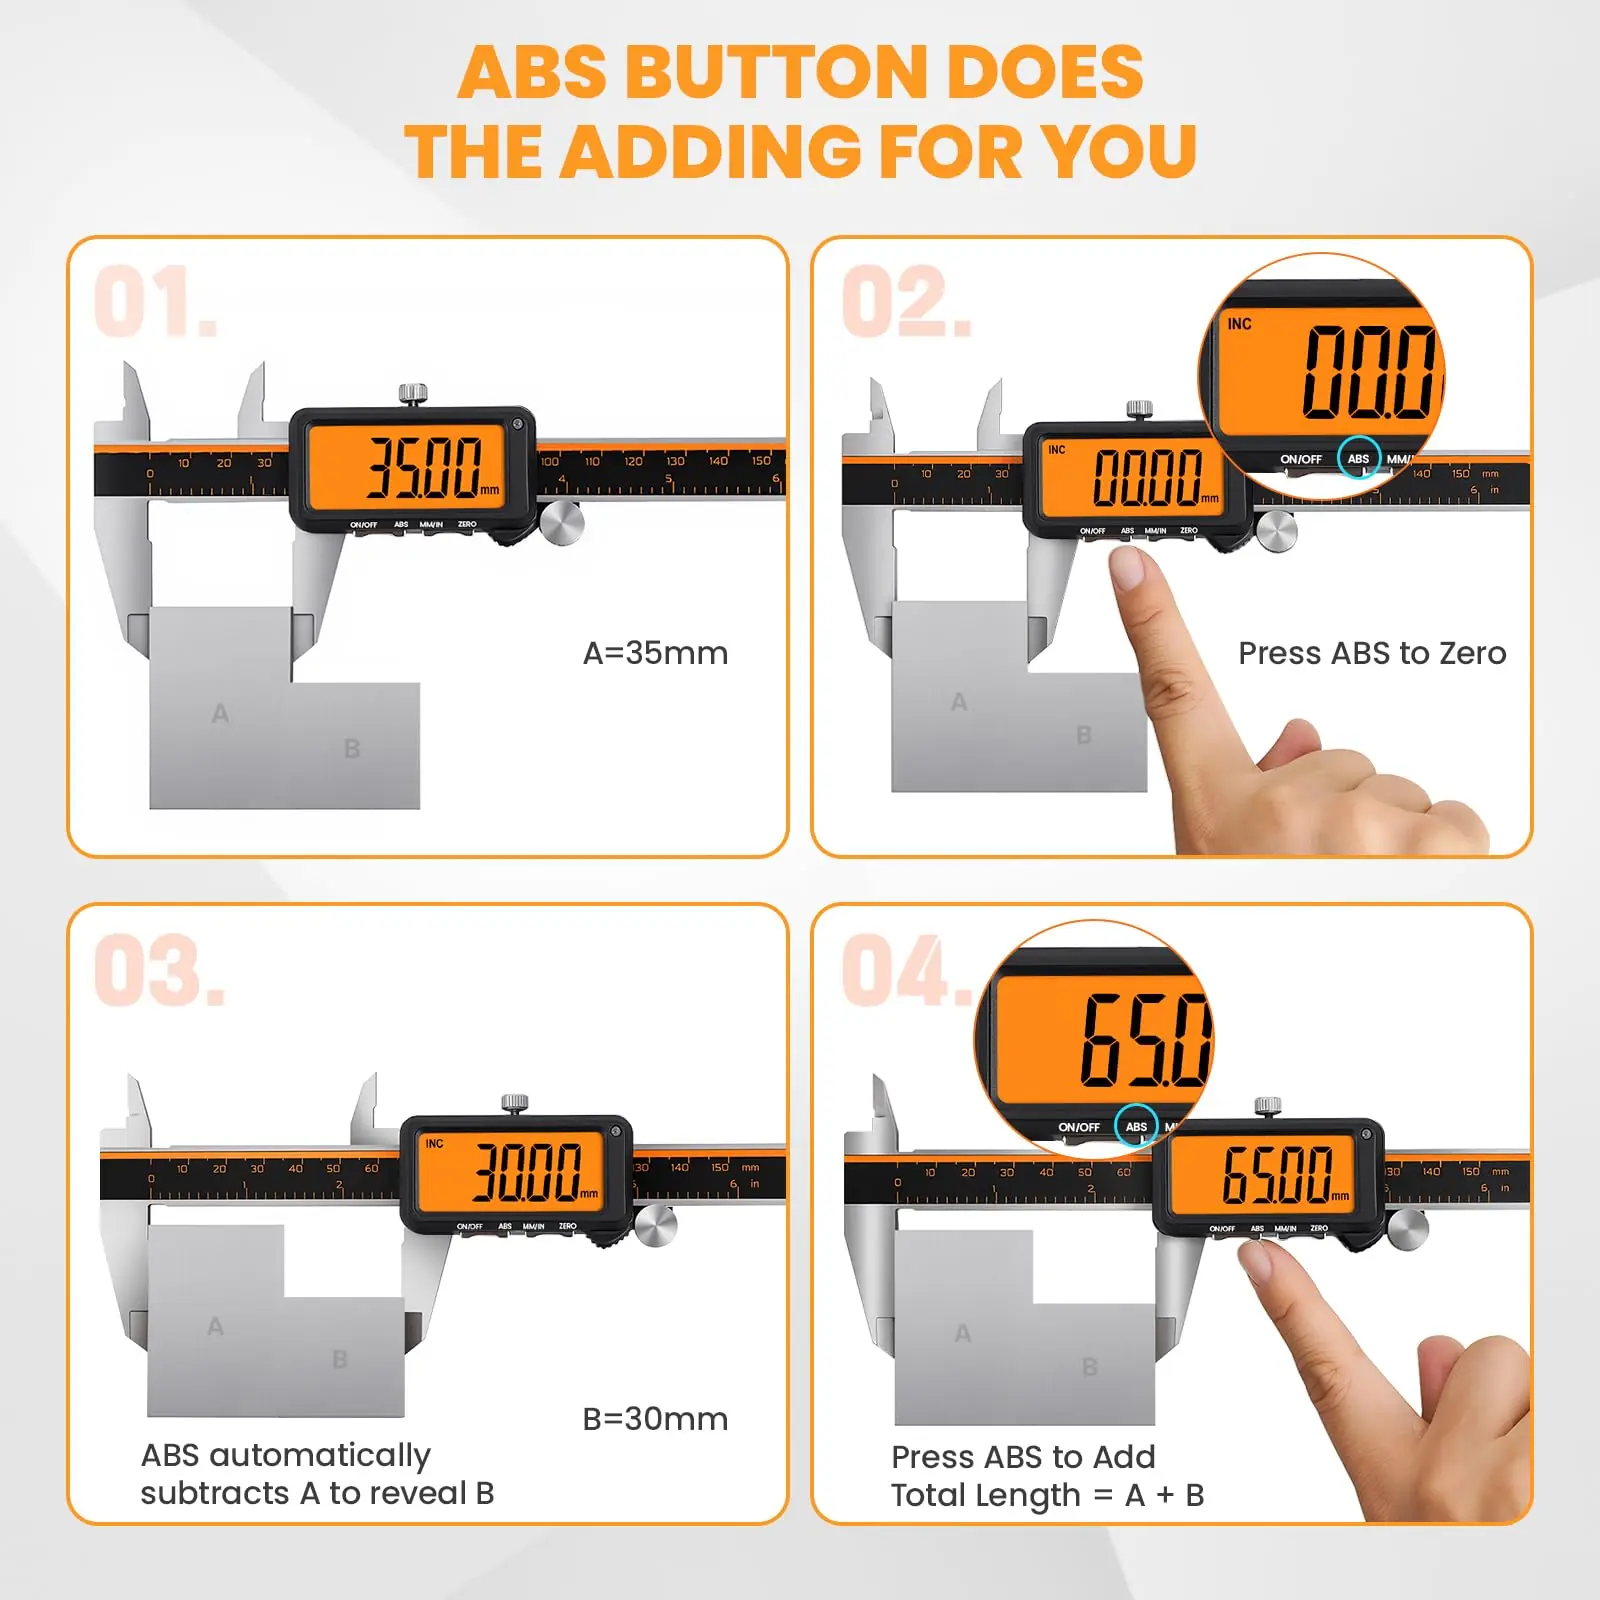
- Power on and zero. Close the jaws completely, then press the zero/origin button. The display should read 0.00 mm.
- Select your unit. Press the mm/inch button to toggle between metric, imperial, and fractional readings. For UK engineering work, stick with metric unless drawings specify otherwise.
- Measure. Use the same jaw techniques described above — external, internal, or depth.
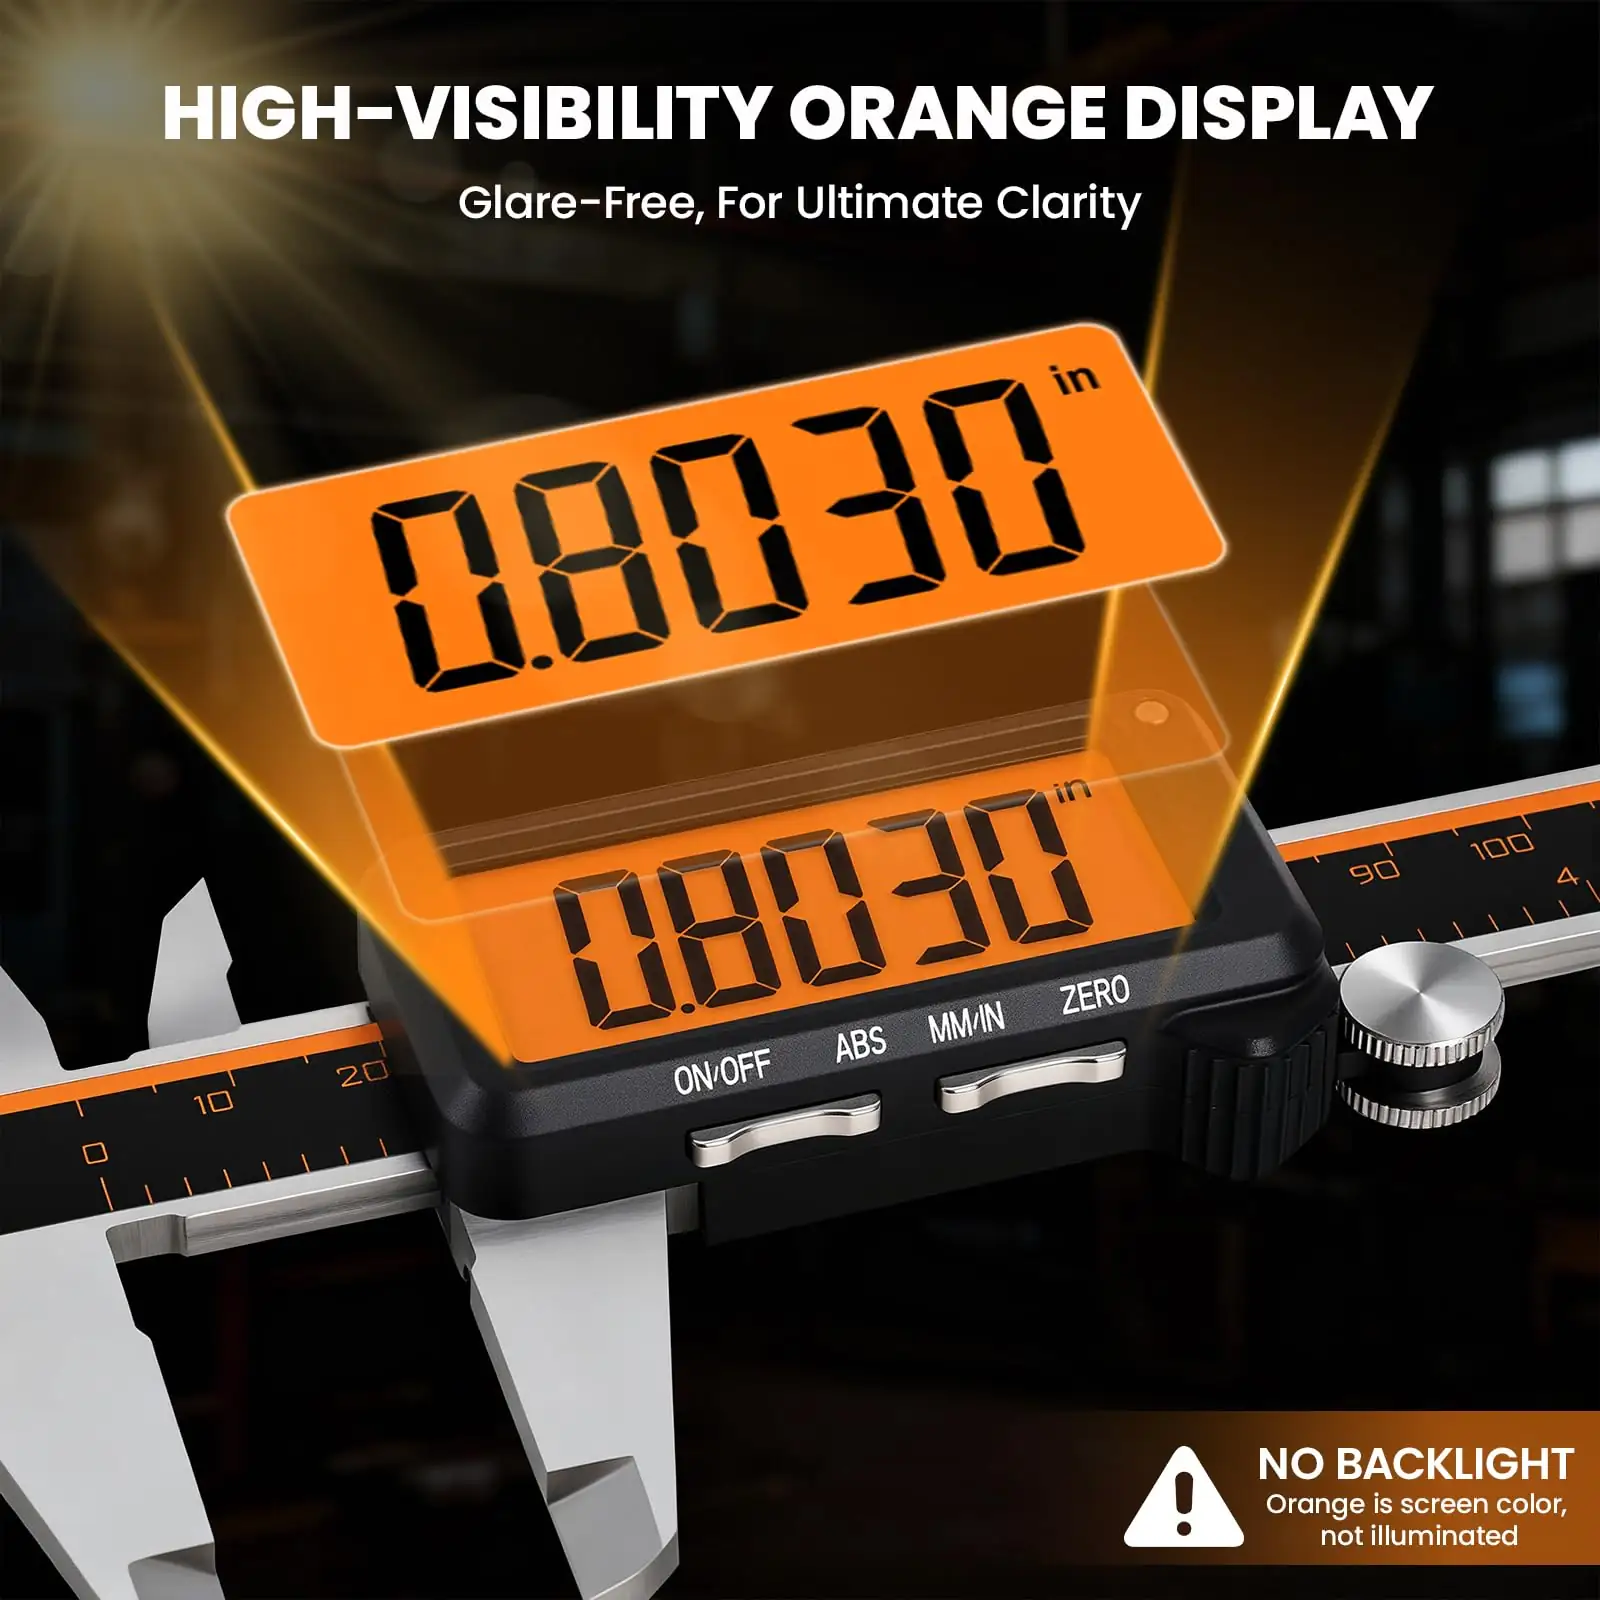
- Read the high-visibility display. The Industrial Night model features a backlit screen that's readable in dim workshop conditions. Brilliant if you're working under a vehicle or in a poorly lit garage.
I've been testing the Accumeasure unit this spring alongside my old analogue caliper. The rechargeable design is genuinely useful — I got tired of hunting for CR2032 batteries every few months. The display contrast is noticeably better than cheaper digital vernier calipers I've used previously.
For those exploring the full Accumeasure range, they also offer an electronic caliper variant and a dedicated digital vernier caliper model — worth comparing if you need specific features like data output or IP-rated dust protection.
Common Mistakes When Using Vernier Calipers

Even experienced users make errors. Here are the ones I see most often — and how to fix them.
1. Excessive Jaw Pressure
Clamping too hard compresses soft materials and can spring the jaws on cheaper tools. Light, consistent pressure only. If you're measuring aluminium or plastic, barely touch the surfaces.
2. Not Zeroing Before Use
Thermal expansion, wear, and debris all cause zero drift. Always close and check zero before every measurement session. The British Standards Institution (BSI) recommends regular calibration checks for instruments used in quality-critical applications — BS 887 covers vernier caliper accuracy standards specifically.
3. Measuring at an Angle
The caliper must be perpendicular to the surface being measured. Tilting even 5° on a 20 mm diameter gives a false reading of approximately 20.08 mm. Sounds small. Adds up fast in assembly work.
4. Ignoring Temperature Effects
Steel expands at roughly 11 µm per metre per °C. A 150 mm caliper measuring a steel part at 35°C versus the calibrated 20°C will show approximately 0.025 mm error. For most workshop tasks that's negligible. For precision grinding or gauge work, it matters.
5. Reading Parallax (Analogue Only)
Viewing the vernier scale at an angle causes parallax error. Always read the scale straight-on, at eye level. This is one reason reading a vernier caliper correctly requires good lighting and positioning — and why a lot of people give up on analogue too soon.
The Health and Safety Executive (HSE) guidelines on workplace measurement emphasise that incorrect measurements can lead to component failures. It's not just about accuracy for its own sake — it's about safety in assembled products., with availability in Scotland
Frequently Asked Questions
How do I read a vernier caliper accurately?
Read the main scale value to the left of the vernier zero mark, then find the vernier line that aligns perfectly with any main scale line. Multiply that vernier division number by the resolution (typically 0.02 mm) and add it to the main scale reading. For example, main scale 15 mm plus vernier line 23 gives 15 mm + (23 × 0.02) = 15.46 mm.
What's the difference between a vernier caliper and a digital vernier caliper?
A digital vernier caliper replaces the manual vernier scale with an electronic encoder and LCD display, showing readings instantly to 0.01 mm resolution. Digital models eliminate parallax error and reading mistakes, though they require battery power. Analogue vernier calipers typically resolve to 0.02 mm and need no power source. The Accumeasure Digital Caliper at £25.70 offers rechargeable convenience with 0.01 mm resolution.
How often should I calibrate my vernier caliper?
For professional workshop use, calibrate every 6–12 months against certified gauge blocks traceable to national standards. Check zero daily before use. BS 887 specifies accuracy requirements for vernier calipers — a 150 mm caliper should maintain ±0.03 mm accuracy. If you drop the tool or notice inconsistent readings, recalibrate immediately regardless of schedule.
Can I use a vernier caliper for depth measurements?
Yes. Every standard vernier caliper includes a depth rod that extends from the beam end as you open the jaws. Place the beam flat across the hole opening, extend the rod to the bottom surface, then lock and read. Accuracy for depth measurements is typically ±0.05 mm due to the difficulty of maintaining perfect beam contact. Take multiple readings for best results.
What does DIY mean in the context of precision measurement?
DIY in precision measurement means performing accurate dimensional checks yourself rather than relying on professional metrology services. With a quality vernier caliper (£15–£90 for digital models in 2026), home workshop users can achieve ±0.02 mm accuracy — sufficient for engine rebuilds, 3D printing verification, and bespoke fabrication work that previously required specialist equipment.
How do you read vernier calipers in imperial (inches)?
Imperial vernier calipers have a main scale in inches divided into 0.025-inch increments (40 divisions per inch). The vernier scale has 25 divisions. Read the main scale value, then find the aligned vernier line and multiply by 0.001 inch. Digital models like the Accumeasure at £25.70 switch between mm and inches at the press of a button, eliminating manual conversion entirely.
Key Takeaways
- A vernier caliper measures external, internal, and depth dimensions to 0.02 mm resolution — one tool, three measurement types.
- Always zero the caliper before measuring and use light, even jaw pressure to avoid compression errors.
- How to read a vernier caliper: main scale whole millimetres + vernier aligned line × 0.02 mm = total reading.
- Digital vernier calipers (like the Accumeasure at £25.70) eliminate reading errors and offer 0.01 mm resolution with instant display.
- Calibrate every 6–12 months against traceable gauge blocks per BS 887 standards for professional accuracy.
- Temperature, angle, and jaw pressure are the three biggest error sources — control all three for reliable measurements.
- Learn on analogue first, then switch to digital for speed — understanding the principle makes you a better measurer regardless of tool type.
Putting It All Together
Knowing how to use a vernier caliper properly is a fundamental skill. Whether you're a time-served machinist or someone who's just discovered that a tape measure won't cut it for fitting replacement bearings, the caliper is your precision gateway tool.
I'd recommend starting with a decent digital model — the Accumeasure Digital Caliper Industrial Night at £25.70 gives you professional-grade accuracy without the learning curve of reading analogue scales. That's not to say analogue isn't worth learning. It absolutely is. But if you need accurate measurements today, digital gets you there faster.
My experience? I keep both in my toolbox. The digital for speed, the analogue as backup and for teaching mates who ask how vernier caliper scales actually work. Between the two, I've never been caught short on a measurement — from checking brake disc thickness to verifying 3D printed parts for a shelf bracket project last month.
Get yourself a quality caliper, practise the techniques above, and you'll wonder how you ever managed without one. Sorted.
Ready to try ACCUMEASURE?
Shop Now — £25.70