How to Read a Vernier Caliper: A Step-by-Step Guide to Precise Readings
How to Read a Vernier Caliper: A Step-by-Step Guide to Precise Readings
Master the technique of reading vernier calipers with this practical, visual-led tutorial. We break down the main scale, vernier scale, and the simple formula that ties them together — whether you're an engineering student, a working professional, or a hands-on DIY enthusiast.
What Is a Vernier Caliper?
A vernier caliper is a precision measuring instrument capable of reading external dimensions, internal dimensions, and depths to an accuracy of ±0.02 mm or ±0.05 mm, depending on the model. It's been a staple in engineering workshops, classrooms, and home toolkits for well over a century. And honestly? Even with digital options flooding the market, the analogue vernier caliper remains one of the most reliable tools you can own.
I first picked one up years ago — a battered old thing I found in a toolbox at a car boot sale off the Cregagh Road. Didn't have a clue how to use it. But once I learned how to read a vernier caliper properly, it became one of those tools I reach for constantly. Measuring pipe diameters, checking bolt sizes, even sorting out a dodgy shelf bracket. It's brilliant for all of it.
The principle is simple. Pierre Vernier invented the scale back in 1631. Two graduated scales slide against each other. The secondary (vernier) scale subdivides the smallest division on the main scale, giving you that extra decimal place of precision. That's it. No batteries, no electronics — just clever engineering.
Anatomy of the Caliper: Parts You Need to Know
Before you can read from a vernier caliper with any confidence, you need to know what you're looking at. Here's a quick breakdown of the key components:
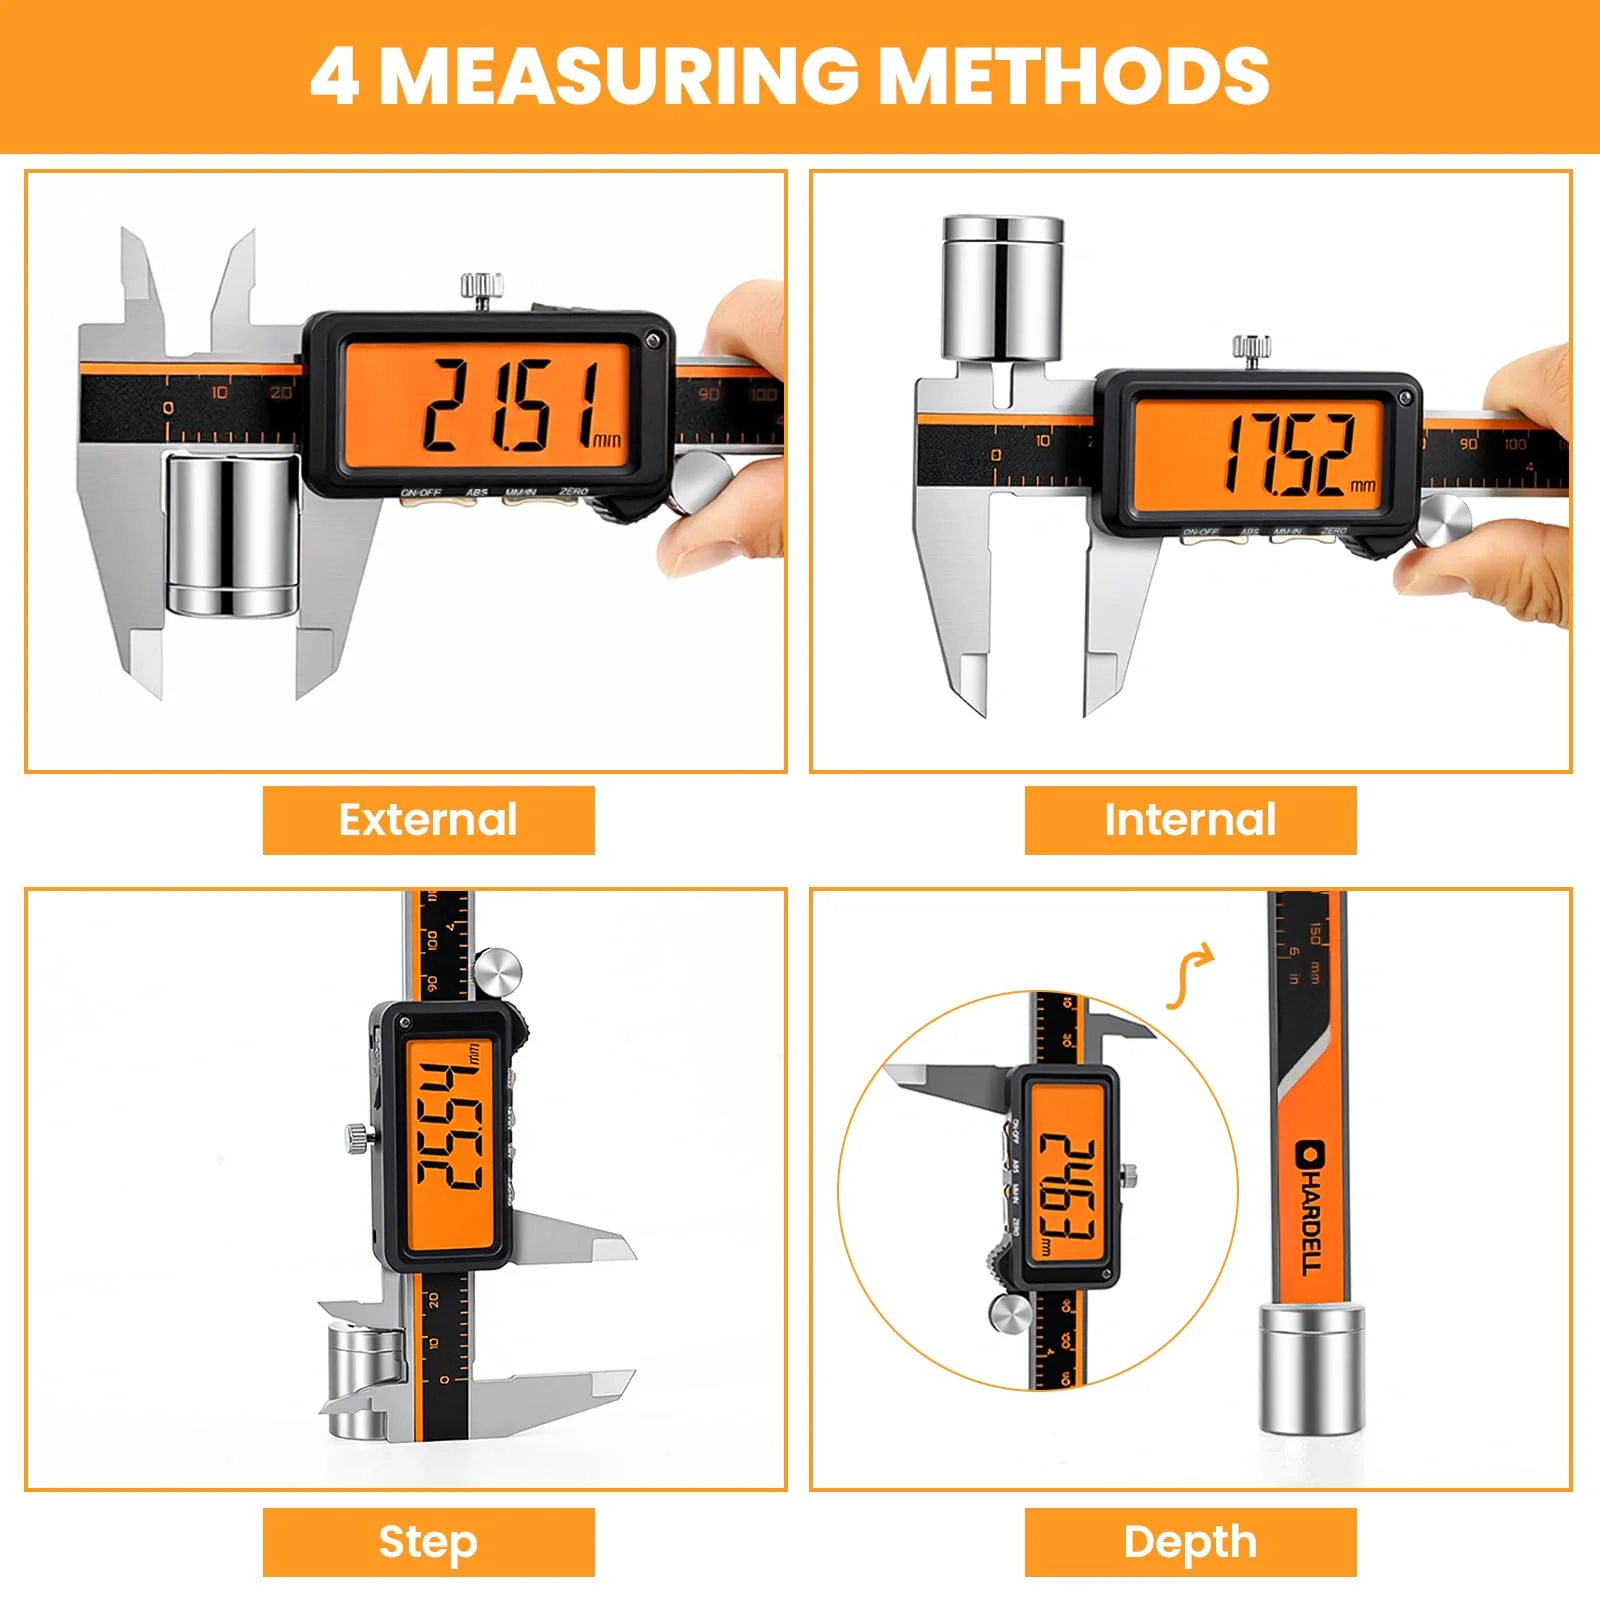
External Jaws
The large jaws at the bottom. These clamp around an object to measure its outside diameter or width. You'll use these most often.
Internal Jaws
Smaller jaws at the top. Slide these inside a hole or tube to measure internal dimensions. Dead handy for pipe work.
Depth Rod
A thin rod extending from the end of the caliper. Push it into a hole or step to measure depth. Often overlooked, but incredibly useful.
Main Scale
Graduated in millimetres (and sometimes inches on the reverse). This gives your primary reading. On a standard metric caliper, the main scale reads in 1 mm increments.
Vernier Scale
The sliding scale — typically divided into 50 divisions over 49 mm, giving a resolution of 0.02 mm. Some models use 20 divisions over 19 mm for a 0.05 mm resolution. This is where the magic happens.
Locking Screw
Tighten this once you've taken your measurement. Stops the jaws from shifting while you read the scales. Don't skip this step — I've lost count of how many readings I've botched by forgetting to lock.
How to Read a Vernier Caliper: Step-by-Step
Reading vernier calipers accurately takes practice, but the process itself is straightforward once you understand the formula. Here's how to do it, broken into clear stages., a favourite among Britain’s tradespeople
Step 1: Zero Check
Close the jaws completely. The zero line on the vernier scale should align perfectly with the zero on the main scale. If it doesn't, you've got a zero error — note it down and apply a correction to your final reading. This is non-negotiable. Every single measurement starts here.
Step 2: Place the Object
Open the jaws and gently clamp them around the object you're measuring. Don't force it. The jaws should make firm, even contact without squeezing or distorting the workpiece. Tighten the locking screw.
Step 3: Read the Main Scale
Look at where the zero line of the vernier scale falls on the main scale. Read the last whole millimetre mark that the zero line has passed. For example, if the zero line sits between 23 mm and 24 mm, your main scale reading (MSR) is 23 mm.
Step 4: Read the Vernier Scale
Now scan along the vernier scale until you find the line that aligns most precisely with any line on the main scale. Note that division number. If it's the 17th division on a 0.02 mm caliper, your vernier scale reading (VSR) is 17 × 0.02 = 0.34 mm.
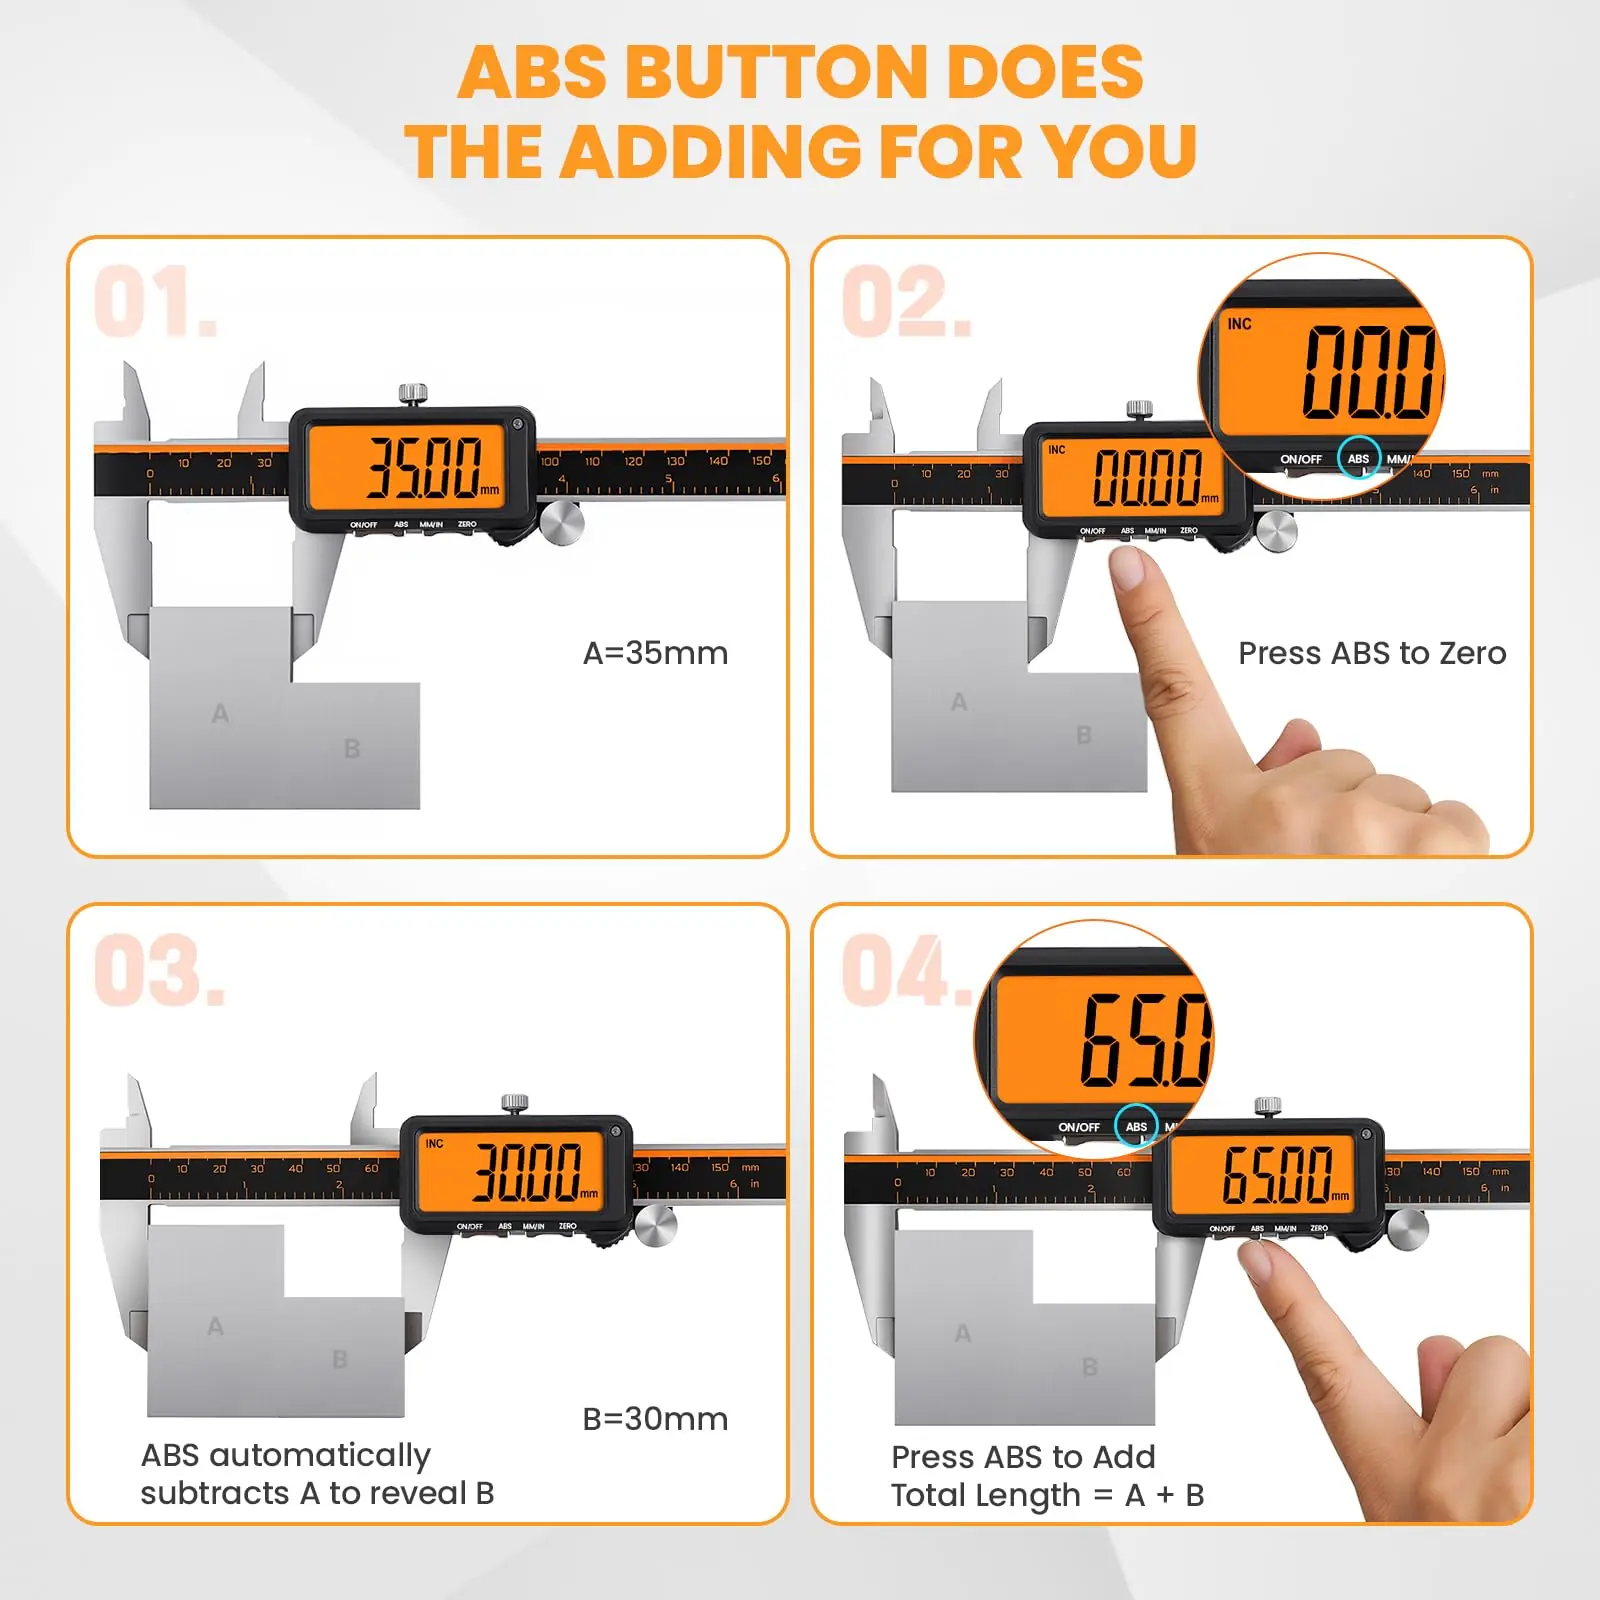
Step 5: Apply the Formula
Total Reading = Main Scale Reading (MSR) + Vernier Scale Reading (VSR)
Example: 23 mm + 0.34 mm = 23.34 mm
That's the whole process. Simple enough on paper — though spotting which vernier line aligns best takes a bit of practice, especially under workshop lighting. Stick with it. After a dozen readings, it becomes second nature.
Worked Examples with Real Measurements
Theory is one thing. Let's walk through two practical examples so you can see how to read vernier caliper readings in context.
Example 1: Measuring a Steel Rod (0.02 mm Resolution)
You're measuring the diameter of a steel rod. After clamping the jaws:
- Main scale reading: The vernier zero line has passed 15 mm but not reached 16 mm → MSR = 15 mm
- Vernier scale reading: The 23rd vernier line aligns with a main scale line → VSR = 23 × 0.02 = 0.46 mm
- Total reading: 15 + 0.46 = 15.46 mm
Example 2: Measuring a Plastic Tube (0.05 mm Resolution)
Using a caliper with 0.05 mm least count to measure a tube's outer diameter:
- Main scale reading: Zero line has passed 32 mm → MSR = 32 mm
- Vernier scale reading: The 7th division aligns → VSR = 7 × 0.05 = 0.35 mm
- Total reading: 32 + 0.35 = 32.35 mm
See the pattern? Once you've got the formula down, how you read vernier calipers doesn't really change — only the least count value shifts between instruments. One more thing: always take three measurements and average them. It catches any inconsistency in jaw placement or parallax., popular across England
Analogue vs Digital Vernier Calipers: Which Should You Use?

This is where things get interesting. A digital vernier caliper does the maths for you — the reading appears on an LCD screen instantly. No squinting at tiny lines. No mental arithmetic. So why bother learning how to use a vernier caliper the old-fashioned way?
Because batteries die. Screens crack. Electronics fail in wet or dusty environments. And if you don't understand the underlying principle, you can't spot when a digital caliper is giving you a dodgy reading. I've seen it happen — a mate of mine trusted a cheap digital caliper on a job and ended up machining parts 0.3 mm oversize. Expensive mistake.
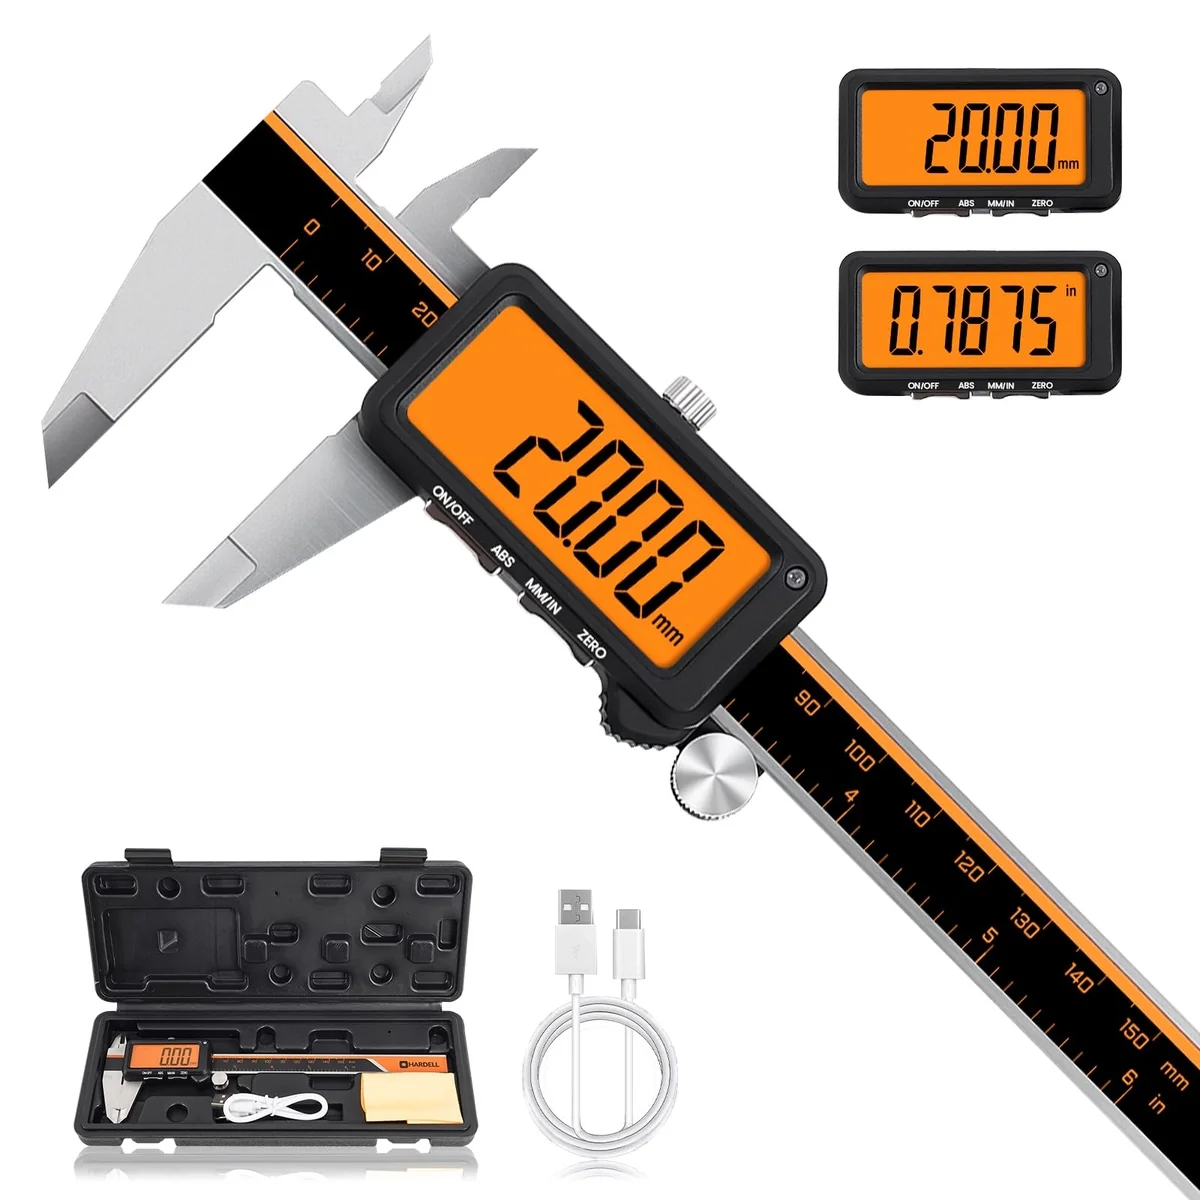
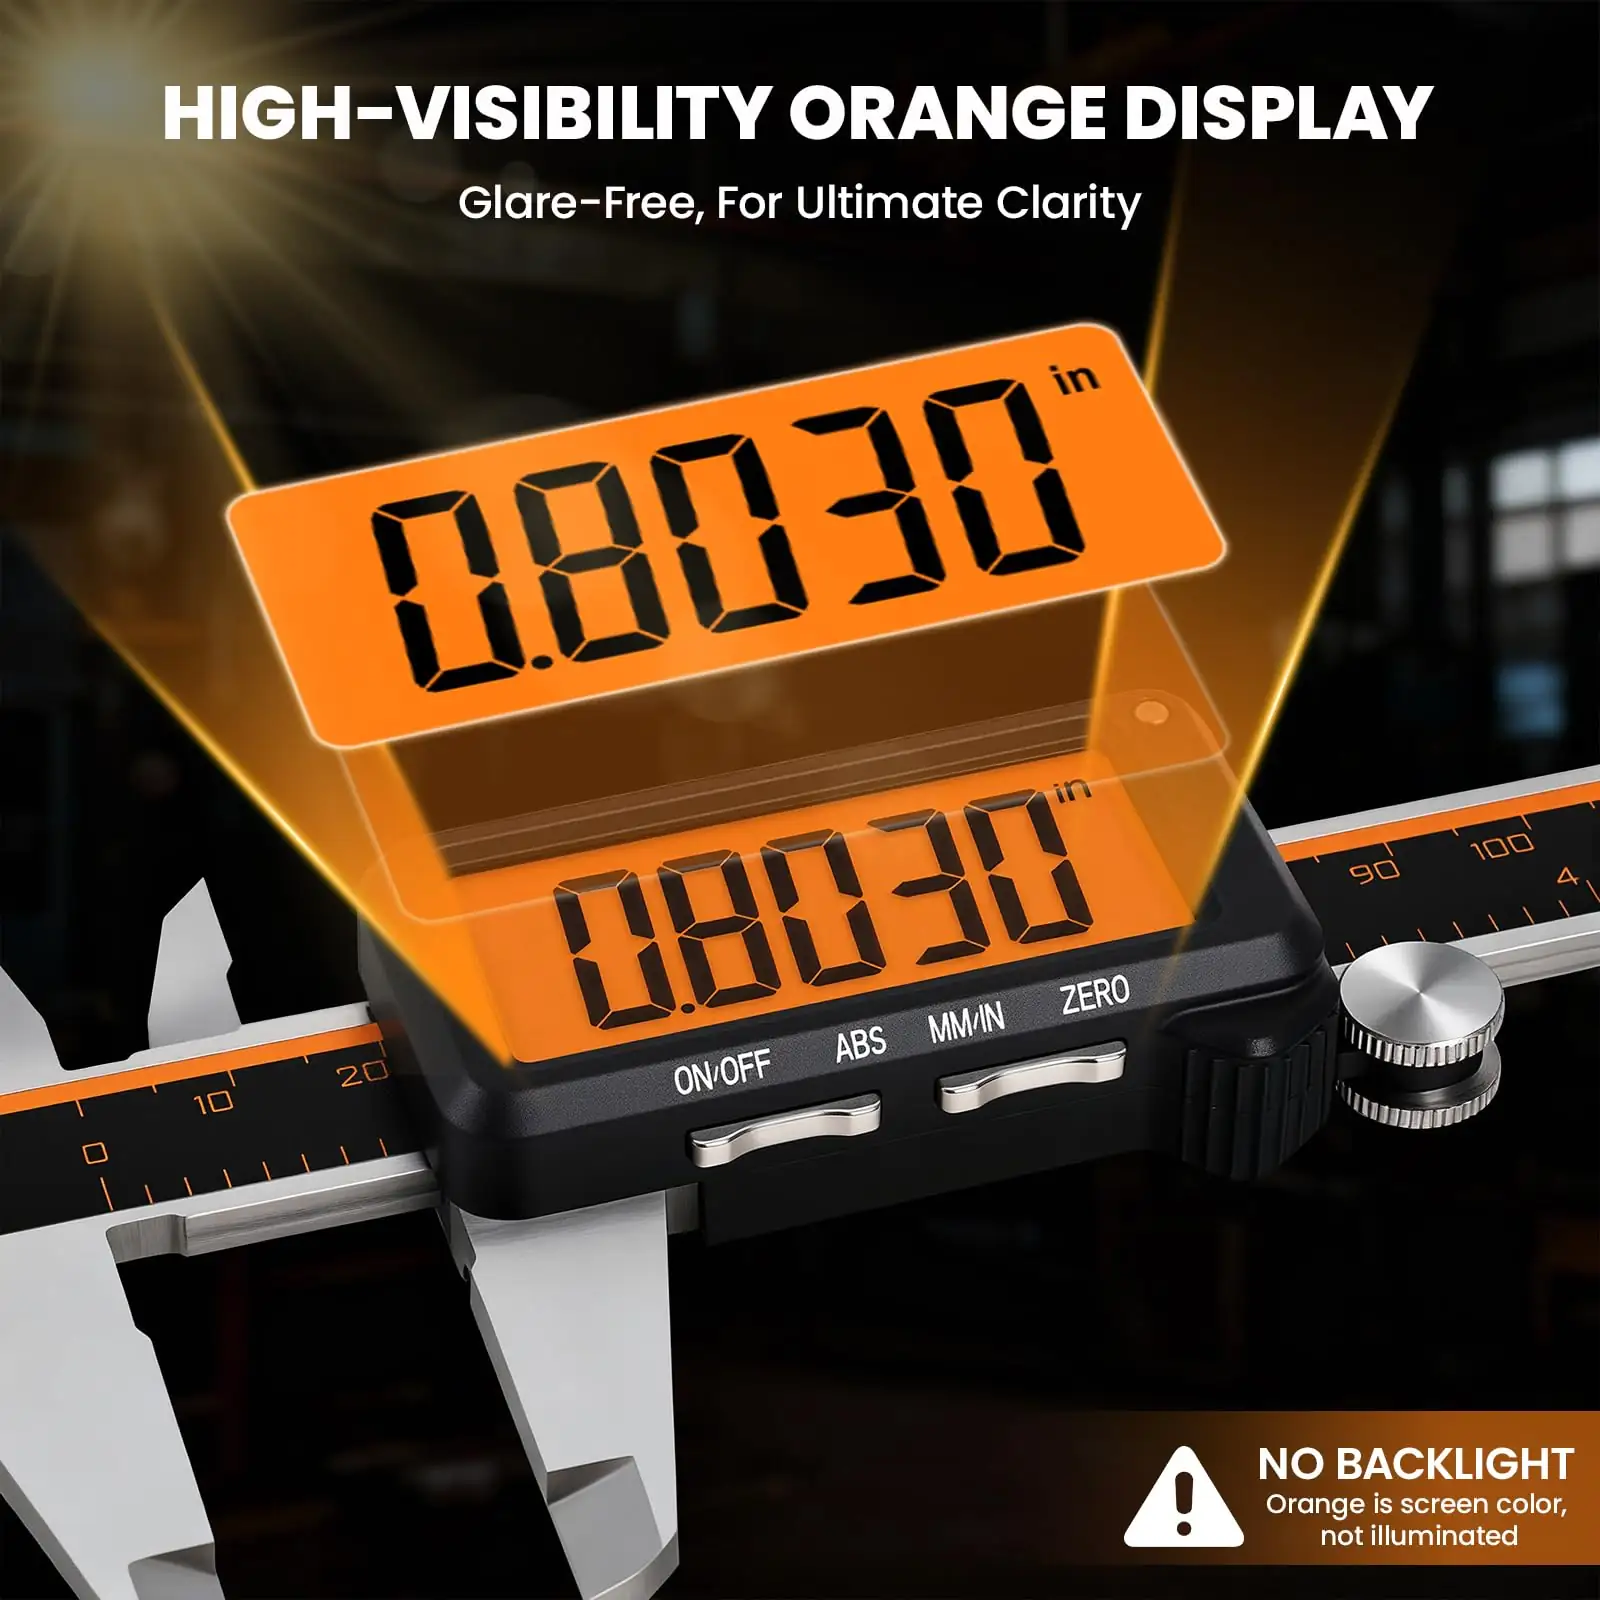
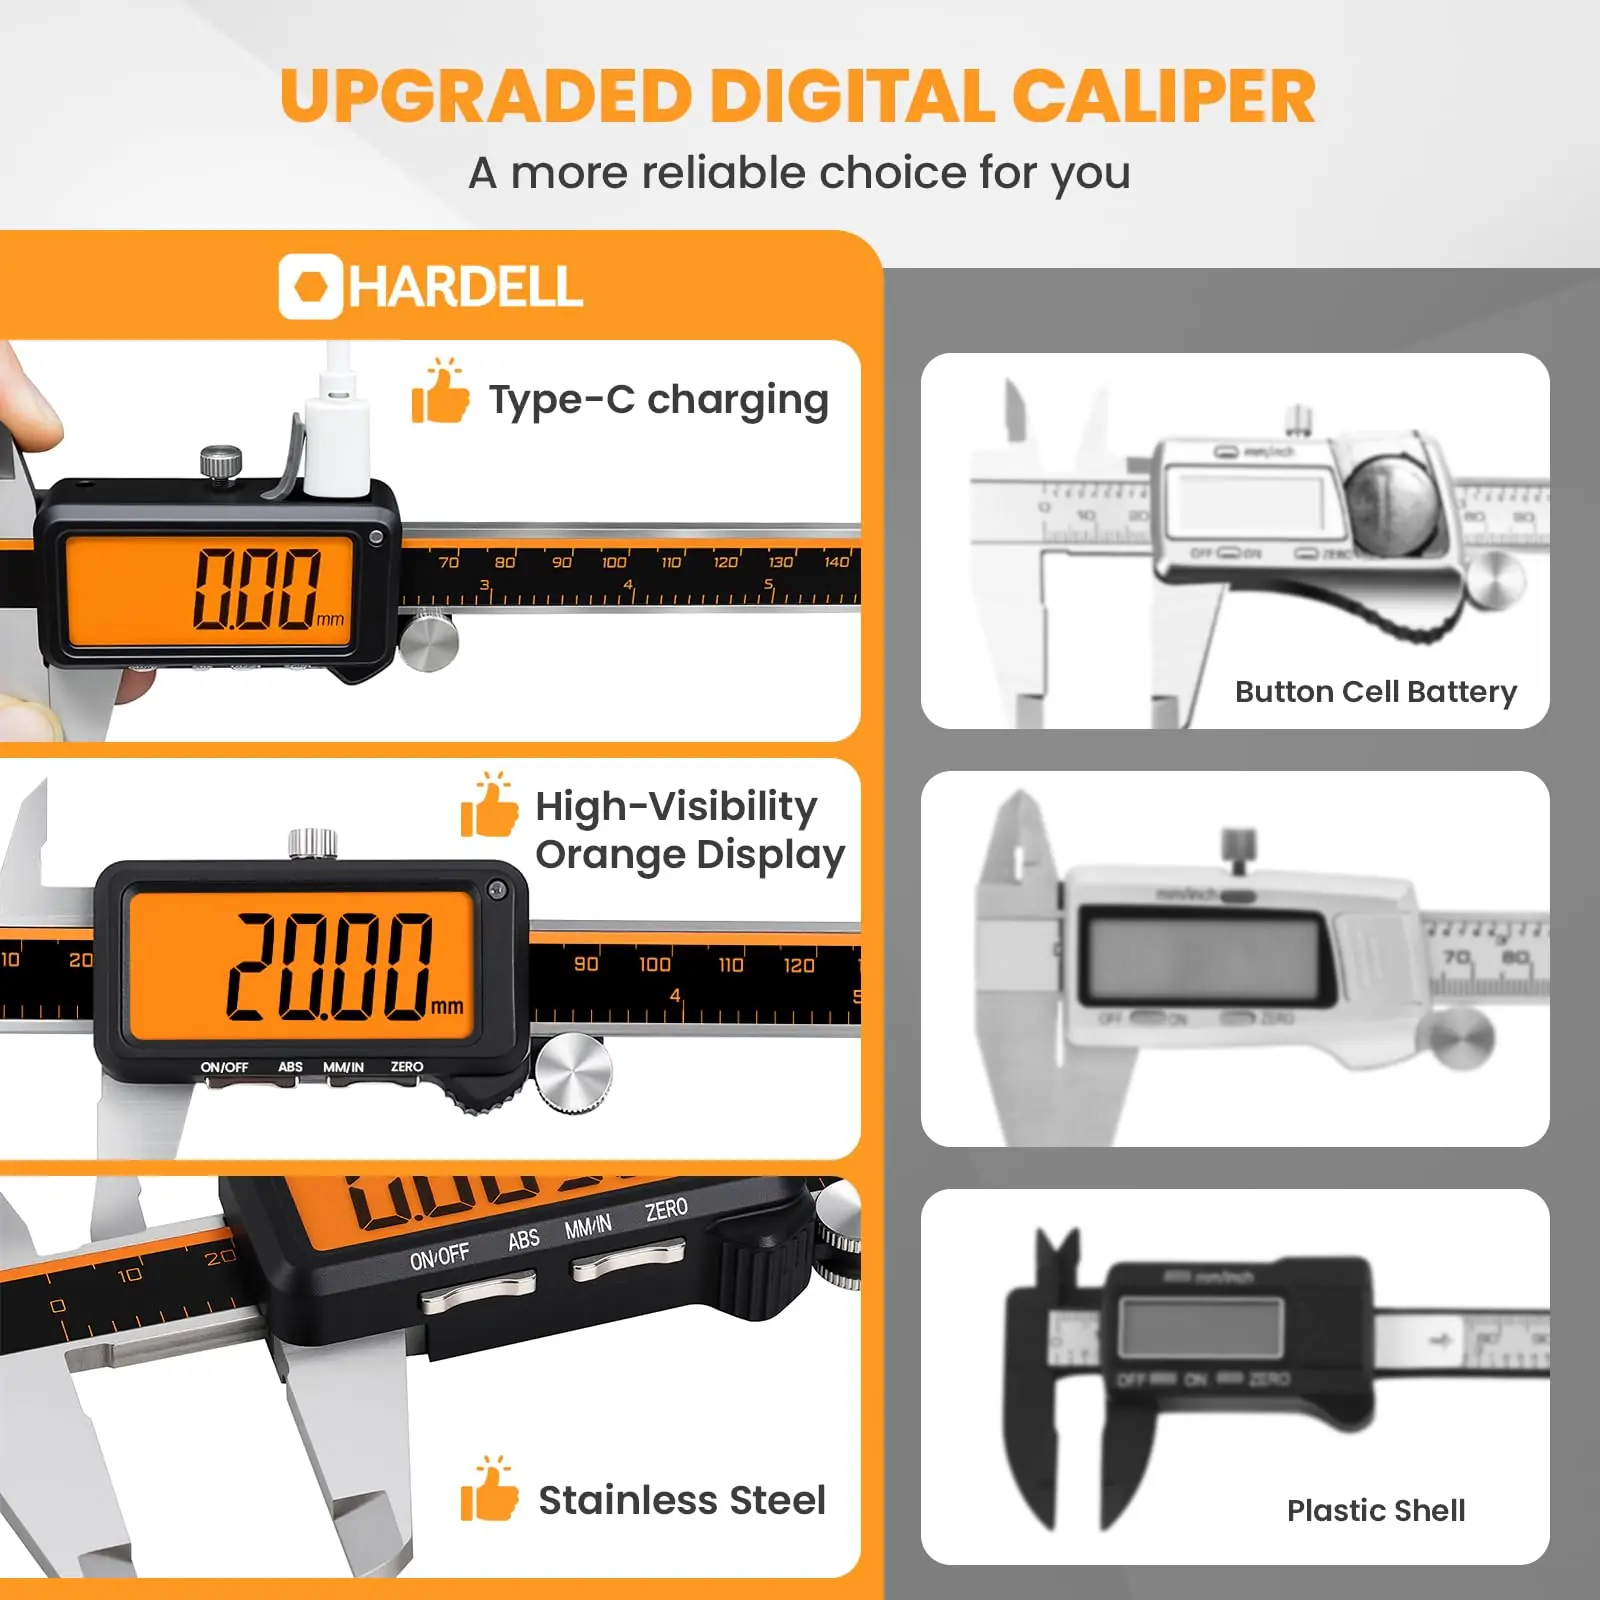
That said, for speed and convenience, a quality digital caliper is hard to beat. The ACCUMEASURE Digital Caliper Industrial Night, priced at £25.70, features a high-visibility display that's readable even in dim workshop conditions. It's rechargeable — no faffing about with coin cell batteries — and switches between mm, inches, and fractions. Decent bang for your buck.
| Feature | Analogue Vernier Caliper | Digital Vernier Caliper (e.g. ACCUMEASURE) |
|---|---|---|
| Resolution | 0.02 mm or 0.05 mm | 0.01 mm |
| Accuracy | ±0.02 mm to ±0.05 mm | ±0.02 mm typical |
| Power Source | None required | Rechargeable battery (ACCUMEASURE) |
| Ease of Reading | Requires training | Instant LCD readout |
| Price Range (UK) | £8–£60 | £15–£80 (ACCUMEASURE: £25.70) |
| Durability | Extremely robust | Sensitive to moisture/dust |
| Unit Switching | Fixed (mm or imperial) | mm / inches / fractions |
| Best For | Education, field work, backup | Production, speed, convenience |
My honest recommendation? Own both. Learn on analogue, work with digital. If you're shopping for a reliable digital vernier caliper, the ACCUMEASURE range at accumeasure.co.uk is spot on for the price point — especially the Industrial Night model with its rechargeable design.
Common Mistakes and How to Avoid Them
Even experienced engineers slip up occasionally. Here are the pitfalls I've seen (and made) most often when reading vernier calipers.
1. Ignoring Zero Error
This is the number one mistake. If your caliper has a positive or negative zero error of, say, +0.04 mm, every single reading will be off by that amount. Always check zero before measuring. Always.
2. Parallax Error
Reading the scale at an angle introduces parallax. Your eye should be directly above the vernier scale, perpendicular to the beam. Sounds obvious, but in a cramped workshop or under a vehicle, it's easy to forget. (Torches help more than people admit, too.)
3. Excessive Jaw Pressure
Clamping too hard distorts soft materials — plastic, aluminium, even thin-walled steel tube. Use firm but gentle contact. If you're measuring something soft, consider using a digital electronic caliper with a consistent-force thumbwheel.
4. Misidentifying the Aligned Vernier Line
This trips up beginners constantly. Two or three vernier lines might look "close" to alignment. Take your time. Tilt the caliper slightly under good light. The correct line will stand out — it'll form a continuous straight line with the main scale graduation.
5. Not Cleaning the Jaws
Swarf, dust, oil — any debris on the jaw faces will throw your reading off. A quick wipe with a lint-free cloth before each measurement takes two seconds. Do it.
The British Standards Institution (BSI) publishes guidelines on measurement instrument use and calibration under BS 887, which covers vernier calipers specifically. Well worth a look if you're working in a quality-controlled environment., with availability in Scotland
Care, Maintenance, and Calibration

A well-maintained vernier caliper can last decades. Literally. I've still got that car boot sale find, and it reads true after a proper clean and recalibration.
Daily Care
- Wipe jaw faces and beam after every use
- Store in a protective case — never loose in a toolbox drawer
- Apply a thin film of light machine oil to the beam to prevent corrosion
- Never use the caliper as a scriber, lever, or makeshift hammer (you'd be surprised)
Calibration
For professional applications, calibrate your caliper against gauge blocks at least every 12 months, or more frequently in high-use environments. The UK Government's National Measurement Strategy outlines traceability requirements for measurement instruments used in regulated industries.
If you're a DIY enthusiast — and by DIY, I mean the hands-on, do-it-yourself kind (that's what DIY means, for anyone wondering about the diy meaning) — annual calibration probably isn't necessary. But do check zero error regularly and compare readings against a known reference. A 25 mm gauge block costs under £10 and gives you peace of mind.
When to Replace
Worn jaw faces, a stiff or wobbly slide, or persistent zero error that can't be corrected — these all signal it's time for a new caliper. Given that a quality digital model like the ACCUMEASURE Industrial Night runs just £25.70, replacement is often more cost-effective than repair.
Frequently Asked Questions
How do I read a vernier caliper in millimetres?
Read the main scale value at the vernier zero line, then find the vernier division that aligns with any main scale line. Multiply that division by the least count (0.02 mm or 0.05 mm) and add it to the main scale reading. For example, a main scale reading of 18 mm plus the 14th vernier division on a 0.02 mm caliper gives 18 + (14 × 0.02) = 18.28 mm.
How do you read vernier calipers with a zero error?
First, close the jaws and note the zero error — positive if the vernier zero is right of the main scale zero, negative if left. Subtract a positive zero error from your reading, or add a negative one. For instance, if zero error is +0.06 mm and your measured reading is 25.40 mm, the corrected value is 25.34 mm.
What's the difference between a vernier caliper and a digital vernier caliper?
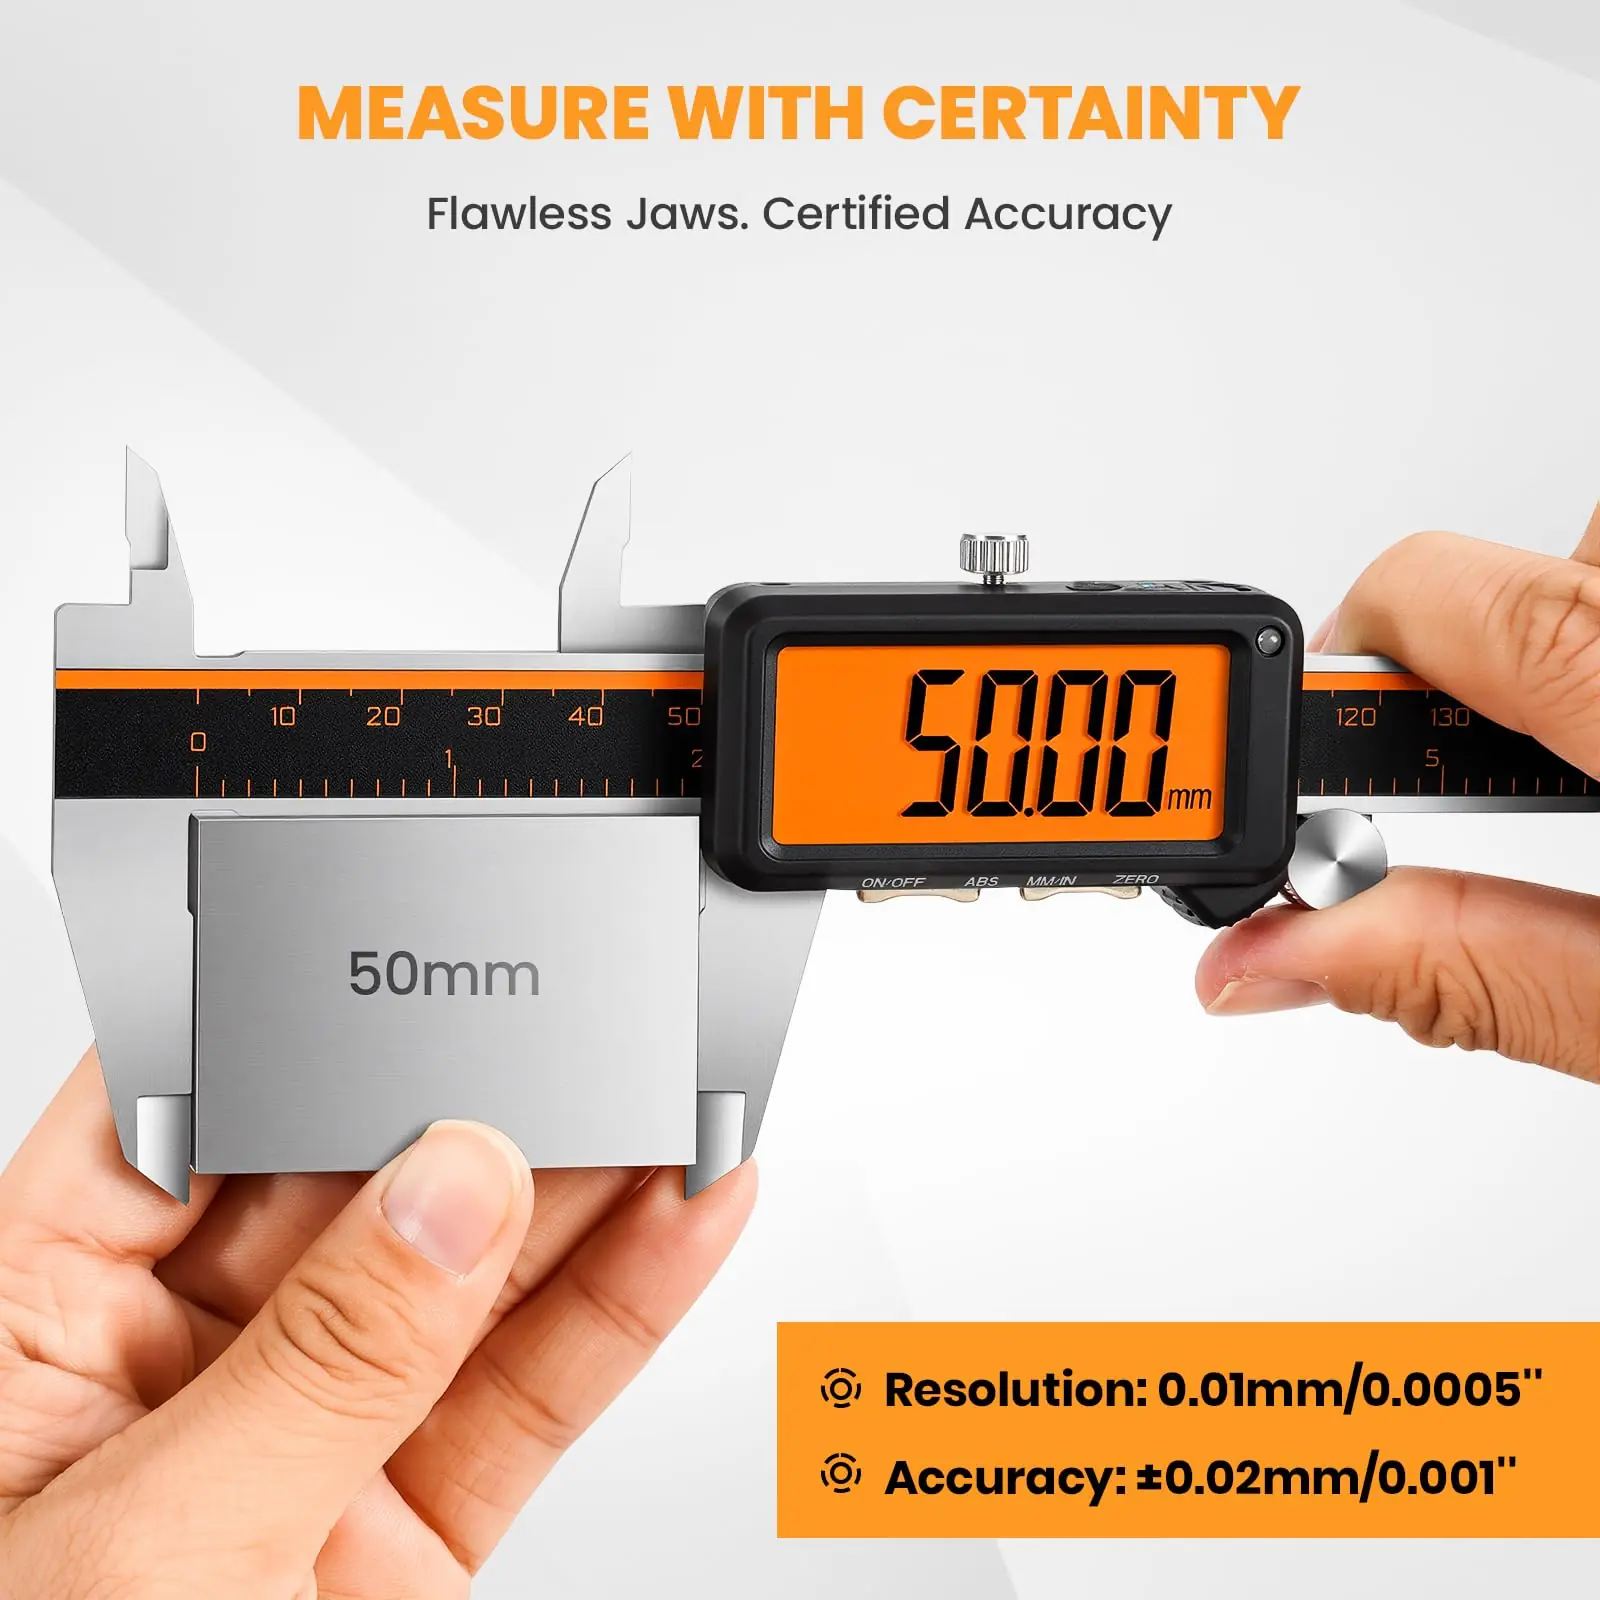
An analogue vernier caliper uses two mechanical scales requiring manual interpretation, with typical resolution of 0.02 mm. A digital vernier caliper uses an electronic encoder and LCD display to show readings instantly, often to 0.01 mm resolution. Digital models like the ACCUMEASURE Industrial Night (£25.70) also offer unit switching between mm, inches, and fractions.
How accurate is a vernier caliper compared to a micrometer?
A standard vernier caliper offers accuracy of ±0.02 mm to ±0.05 mm, while an outside micrometer typically achieves ±0.001 mm to ±0.005 mm. For measurements requiring tolerances tighter than 0.02 mm, a micrometer is the better choice. Vernier calipers excel in versatility — they measure external, internal, and depth dimensions with a single tool.
Can I use a vernier caliper for DIY projects at home?
Absolutely. A vernier caliper is one of the most useful tools for DIY projects — measuring pipe fittings, checking bolt diameters, verifying material thickness, and more. For home use, a digital model is often easier. The ACCUMEASURE Digital Caliper at £25.70 provides 0.01 mm resolution with a rechargeable battery, making it ideal for weekend projects and general household measurement tasks.
How often should I calibrate my vernier caliper?
For professional and industrial use, calibrate at least every 12 months against certified gauge blocks, as recommended by BS 887 standards. In high-volume production environments, quarterly calibration is advisable. For occasional DIY use, a zero-error check before each measurement session is usually sufficient, backed by an annual comparison against a known reference dimension.
Key Takeaways
- The formula is simple: Total Reading = Main Scale Reading + (Vernier Division × Least Count). Master this and you can read any vernier caliper confidently.
- Always check for zero error before taking measurements — close the jaws and verify alignment of the zero marks on both scales.
- Least count matters: A 0.02 mm caliper has 50 vernier divisions; a 0.05 mm caliper has 20. Know which type you're holding.
- Digital calipers save time but understanding the analogue method protects you from undetected errors. The ACCUMEASURE Digital Caliper Industrial Night at £25.70 is a solid choice for 2026.
- Take three readings and average them to minimise parallax and placement errors — this is standard practice in any UK workshop.
- Clean jaw faces before every measurement. Even microscopic debris can introduce errors exceeding the instrument's resolution.
- Calibrate annually for professional work, referencing BSI standards for traceability requirements in regulated industries.
Ready to try ACCUMEASURE?
Shop Now — £25.70